J’s Frozen 5th Part II: Food & Activities

JFrozen5thPart2

You can’t throw a memorable party without providing good food and solid activities, at least that’s what I think.  Plus, with the exception of J’s Tangled party, which was just the right size, I usually have too many people so I am always thinking, “How am I possibly going to keep everyone happy for two hours?” You feed and entertain them, that’s how.

Food

I love when I am organized enough to coordinate my food with my theme. Or at least be organized enough to actually put up food tents so I can get credit for coordinating my food with my theme.  That second statement might be more accurate. Anna and Hans are so compatible that they “finish each other’s sandwiches,” thus sandwiches were the main fare for this lunch time party. We had smoked gouda on snowflake rolls (yes, I had to get “snowflake” rolls), chicken salad on snowflake rolls and peanut butter and jelly sandwiches. There were also Frozen chicken nuggets, which are an actual thing. You can buy them at WalMart in four Frozen shapes. For snacking, we had Olaf noses (baby carrots), artichoke and jalapeño dip with Ritz snowflake crackers and Frozen gogurts.  There was also a pasta salad, which had nothing to do with the theme, but boy was it filling. For beverages, there was Arctic punch, which was basically lemonade with food coloring and Melted Snowman, water with a carrot thrown in for fun. I neglected to take pictures of the beverages.

There are lots of free printable food tent cards for Frozen parties, but no one set suited my needs, so I ended up making a set of my own. Here are the PDF files if you are interested:frozenfoodtents1 and frozenfoodtents2. They are formatted for Avery food tents.

Dessert is my absolute favorite part, and we had several options because you just never know if the adults are going to each cake or not.  J’s former nanny Tabitha was always very creative and has recently opened up her own business, That’s The Way The Cookie Crumbles, making custom-made cookies and other sweet treats from her home. She made us some adorable Anna, Elsa and Olaf cookies.  I also ordered blue & white cupcakes from HEB (that way I don’t have to learn how to pipe my own frosting) and decorated them with snowflake candies and Frozen figurines. For J’s actual birthday,  I managed to make a blue velvet cake, frost it myself and decorate it with rock candy and Frozen figurines to look like Elsa’s ice castle. For the party, I had HEB make me a white cake so I would not be embarrassed by my lack of frosting skills. Finally, we had Olaf hugs and Kristoff kisses.


Activities

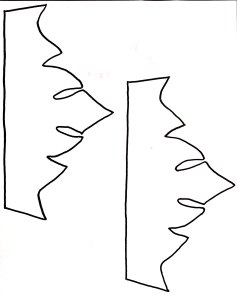
Since I had a lot of kids and each was accompanied by 1-2 parents, I wanted everyone to be eating or active throughout the whole party. When guests filtered in, I sent them to the dining room where I had laid out Frozen coloring and activity pages. Once a few more kids arrived, I let them decorate their choice of crown: Elsa (blue), Anna (pink), Sven (reindeer antlers) or Olaf (snowflake mask). The kids had a blast decorating their headgear.

The activity signs were compliments of Frosted Events. The Sven antlers and Olaf masks were free downloads from Printable Crush. The Elsa/Anna crowns I had to draw freehand because the ones I found online were either too small or one per page. I have provided you with the template here. Simply print on card stock and cut out.

elsacrowntemplate

After lunch, we went outside for a snowball fight.  First, I found these crunchy life-like snowball balls in a 30 pack on the clearance aisle in Target.  Sadly, 30 snow balls were not going to go very far with all the kids I had, so I had to make some more using white pantyhose and polyfill. DH thought the snowball fight was going to be over in 5 min, so our back up plan was for the Dads to lead the kids in a game of Freeze tag.  Thirty minutes later, the kids were still chucking snowballs at each other and their parents, so we did not have to resort to Plan B.

DSC_0308.JPG

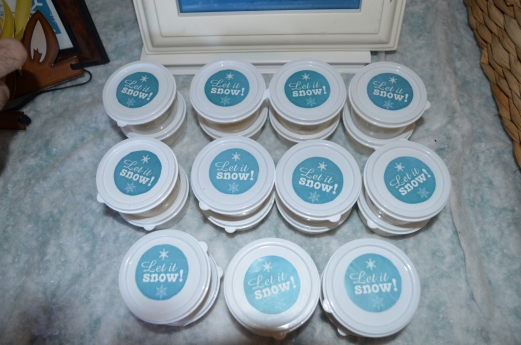
On the way back into the house, I had set up a little tattoo station. I was originally going to make a faux wooden sign that said “Wandering Oaken’s Trading Post and Tattoo Parlor.” Yup, ran out of time for that, but the kids were happy nonetheless. I also made plastic baggies with all the materials to build your own snowman. The bag tags are compliments of Miss and Tell. The sign is from Two Magical Moms.

Finally, it was time for cake and a little more running around to burn off all that sugar. Then, this mamma sealed the doors and settled on the couch with a glass of vino.

DSC_0315.JPG

I had a lot of cupcakes leftover and a couple of snack ideas that I ran out of time to execute. Luckily, the following week was J’s turn to bring snack at school, so my supplies for Olaf cheese sticks and Frozen snack mix did not go to waste.

All in all, it was probably our best party yet. But, I am kinda glad that I’ll have a newborn as an excuse not to throw a massive party this year. I deserve at least one year off, right?

For more ideas, check out my Pinterest idea board here or read about the party preparations here.

J’s Frozen 5th Part I: Party Prep

jsfrozen5thpartyprepwp.jpg

With J’s 6th birthing looming around the corner, I thought it was about time that I posted pictures from her 5th birthday party.

The movie Frozen was released in November 2013 shortly after J’s 3rd birthday. We went to see it as a family over Christmas break, and it was an instant hit in our household as I’m sure it was in any household with young kids.  Our house was soon overrun with princess gear, and it was inevitable that, at some point, I would have to cave in and have a Frozen party. I managed to hold out for two whole years (not bad for Mommy strength) to allow the Frozen fever (get it) to settle down a little.

Invitations

I have been known to be a little elaborate with my invitations in the past. I do realize that they are promptly lost or discarded, so it is total madness to spend a lot of time on them. I decided I wanted a simple snowflake design, and it would be brilliant if there was a template already made for me. After a little Pinteresting, I was able to find this template courtesy of helmighaus.blogspot.com.

Save the date Snowflake - Blank

I was able to download it to PicMonkey, add my own text, and within a few minutes, I had a cute invitation. I then formatted it to print two per page and created a second template by tracing around the edges so that I could border it in a darker color.

Here is my template for the background:

new doc 10_1-2

And here is the final result:

frozeninviteobscured

Party Decor 

Next, I set out to decorate the house.  J and I spent an afternoon making paper snowflakes out of coffee filters, which we hung on the walls and from the chandeliers.  We also purchased blue plastic tablecloths and snow blankets to drape over the tables. The LED lanterns were recycled from our Tangled Birthday Party.

I knew I wanted to incorporate Elsa’s coronation banner in the decor. I did find printable coronation banners online, but I really wanted the colors to be bolder. I also found some templates for die cutting machines, but, alas, I do not have one of those.  In the end, I was forced to download images of Elsa’s silhouette head and the Arendale flower and do a lot of tracing, cutting and pasting on card stock to come up with this banner for the front entry.

DSC_0271.JPG

I used this free printable banner from Bakingdom.com to hang in my dining room and living room and this Happy Birthday Banner from LittleHouseOnTheCircle to hang on my wood wall.

Disney Rewards has free Frozen Travel Posters, and I used one to make a welcome sign for our front gate.  I also found this cute Love Is An Open Door sign from Glitter N Spice.

Finally, our wedding pictures underwent a remake as royal family portraits above the entryway activity and party favor table.


Favors

I had my heart set on making snow dough, complete with glitter and peppermint scent, and I can tell you it was a complete disaster.  I mean, I did give out the play dough as favors, but even after trying three different recipes, it was a little sticky for my taste. I gave it out with the recommendation of keeping it in the fridge. Fortunately, I did find cute containers for it at the dollar store and downloaded a “Let It Snow Image” on google images and made my own labels with Avery’s online software. Here is the PDF file for the labels, and a picture of the favors.

DSC_0323.JPG

Because the snow dough was not up to par, I also made some snack goodie bags and printed some cute labels courtesy of Frosted Events.

DSC_0267

That’s it for the party prep. Whew! In Part II, I’ll post pics of the party activities and food. For more inspiration, visit my Pinterest idea board here.

J’s Tangled Birthday Party Part II: Party Time

TangledCollageAnother Throwback Thursday classic that I neglected to post in all my home renovation frenzy.  In my last post, I detailed all the behind the scenes work- invitations, decorations and activity prep.  Now, I’ll tell you how the day actually went.  I couldn’t have been more pleased!  I scaled down on the guest list a little after last year’s rare freezing temps forced our party inside, and I discovered just how chaotic a kid’s bday party can be.  Fortunately, we were blessed with beautiful weather and the perfect amount of guests.

As guests trickled in, I sat them in the dining room and allowed the kids to work on beautifying their Rapunzel hair or viking hats.  This activity was a hit with both the kids and parents. In fact, I had a hard time getting them to stop and actually eat lunch!

Speaking of eating. Party food is very important, and I wish I had better documented this part. If memory serves me correctly, on the Snuggling Duckly menu that day was:

  • Snuggly Duckling Snacks (fruit, cheese and crackers served in a frying pan, of course)
  • Spinach dip and pita crackers
  • Pascal’s pizza
  • Baked Ziti
  • Rapunzel’s Baked Braids
  • Magic Flower Punch (Lemonade)

For dessert, we had:

  • Rapunzel’s Licorice Braids
  • Mother Gothel’s Macarons
  • Rapunzel’s Favorite Hazlenut Pie
  • Cupcakes
  • Princess fruit snacks

But first, I allowed the kids to run off some steam.  This is essential to avoiding party meltdowns.  We started off inside by pinning the nose on Flynn Rider.  For those of you who are unfamiliar with the movie, before Flynn meets Rapunzel, he is a petty thief and complains they never get his nose right in wanted posters.  I was able to snag this Flynn Rider Wanted poster from Amaye Clyne on Deviant Art. I then took it to Office Depot to have it made into an engineering print. (FYI- I took it to Fedex Kinkos first and they absolutely refused to print it for me because it is a Disney character. It’s a birthday party people!) I then printed a set of noses from everyonecandraw.net. Would you believe that one of the boys pinned the nose right in the center on the first try!

Next, we went outside and played “Catch the Chameleon.” I found multi-colored glow in the dark lizards at the dollar store and bought several packages. I scattered these all over the backyard and the kids had to collect as many lizards as they could. This was in reference to start of the Tangled movie where Rapunzel and Pascal play hide and seek together.

Our last activity was to get “Tangled Up” in Rapunzel’s hair.  I gave the kids several rolls of yellow streamer and watched in amusement as they wrapped each other up in it. Leave it to the boys to add a slight safety risk to this game.  I caught one of them wrapping it around a friend’s neck.  Thankfully, streamers are easy to rip off!

Finally, it was time for cake and the end of a long and exciting afternoon.

DSC_0114

On the way out, we took pictures of all the kids in a cardboard cut-out Flynn Rider poster that my husband made using a second copy of the same engineering print.  I thought the pics would be great to print out with Thank You cards. Unfortunately, I never got around to printing them, but they were kinda silly. For favors, we sent  all our budding new artists home with watercolors. All in all, it was a great day!

DSC_0139

Until the next party- Juliette’s Frozen 5th!

J’s Tangled Birthday Party Part I: Party Prep

TangledPartyICollage

After a six month absence, I make my return to blogging with this oldie but goodie just in time for Throwback Thursday. Like most four year old girls, my J is princess-obsessed.  For her 4th birthday, she requested a Rapunzel theme, and we had a lot of fun with it. If you have not seen the movie Tangled, you will now be enlightened…

First up was the invitations. As always, I found a lot of inspiration via the lovely ladies of Pinterest. Please check out my inspiration board here. I knew I wanted to make a Rapunzel tower invite with hair hanging down from the tower.  I searched for a template to make my job easier, but could not find one to suite my needs.  So I drew one and scanned it to my mobile phone with CamScanner. I uploaded it to Scribd so you can feel free to borrow it.

Next, I created my invitation text in Google Docs, cut and pasted it onto the template and scanned it again with CamScanner. I would have just photocopied it, but I was printing on heavy card stock, and it kept jamming the printer 🙂 I used yellow embroidery floss to make Rapunzel’s hair and cut out glittery purple triangles for the tower roof. Here is my final product.  This went A LOT quicker than last year’s Dora Backpacks.

JRapunzelinvite

Next, I moved onto party favors.  There would be a mix of boys and girls in attendance: Princesses vs. Ruffians if you will. For the princesses, I made Rapunzel hair by braiding yellow yarn, attaching it to elastic headbands and adorning the headbands with flowers. The idea was to create an activity to allow the girls to decorate the hair with flowers like Rapunzel wears in the movie. The best tutorial I found for making the hair is found here, and this is the method I used. I placed the chairs at least 5 ft apart for a long braid to go on my front door, and moved them closer in to make hair for the girls (they are little after all). I had a bunch of braids to make, so it was quite a bit more time consuming than I had originally anticipated.

rapunzelrecipechair

Once, I had all my braids completed, each had an end with a loop and a cut end representing the tail of the braid. I bought colorful elastic headbands at the dollar store and simply centered the headband below the loop, threaded the tail through the loop and this secured the braid to the headband. I then glued on felt flowers to the part of the headband that would be visible at the crown of each girl’s head. Here is my daughter showing off hers.

DSC_0011

For my Ruffians, I made Viking hats. In Tangled, Flynn takes Rapunzel to a bar called The Ugly Duckling. Its occupants most closely resemble vikings.  I made my Viking hats out of cereal boxes and card stock using the tutorial here. I wish I had saved my template for you as it took a few tries to get it right.  The most time consuming part was wrapping the cardboard with duck tape. If I had silver spray paint on hand, I might have gone that route instead. Hind sight is always 20/20.

DSC_0010

I was pretty exhausted after all this crafting, but had a few party decorations to get to. For table dressings, I used dollar store plastic table cloths in purple and yellow.  J’s party falls after her birthday, and her Grammy gave her a birthday card with a very large Rapunzel poster that we hung up.

DSC_0107

I snagged this awesome free printable Tangled pendant at Paging SuperMom, but my laser printer was running low on ink, so I hit a roadblock. Not to be totally derailed, I cut my pendants out of purple card stock and printed a sheet of tangled suns on yellow card stock (sadly the link was taken down so I cannot share this free printable with you). After a little cutting and pasting, I was back in business. I had dollar store paper lanterns left over from J’s Ariel Pool Party (where they served as jellyfish), so I repurposed them as they were originally intended. Go figure.

DSC_0014

Lanterns are a big part of the movie Tangled. Rapunzel’s entire journey from Mother Gothel’s tower is incited by her refusal to let Rapunzel go see the lights that twinkle in the sky each year on her birthday. I came across a lot of tutorials on DIY lanterns. In the end, I went the easy route. I purchased color changing LED lights from the dollar store and pasted Tangled Suns on them. I also have this cool candle light fixture above my dining room table.  It got some Tangled suns also.

Finally, we have a transom above our front door, and I wanted to make it appear that Rapuzel was throwing her hair down from that window. I made an extra long and thick braid to hang above the door and also created a royal purple pendant with the number 4 on it celebrating J’s 4th birthday.

DSC_0085

I was prepped and ready for this party nearly a week ahead of time, and I owe that all to the fact that J is older now and very helpful when it comes to decorating and crafting.  I am sad to see her grow up so quickly but also so proud at how far she’s come in this world.  Until next time- J’s Tangled Birthday Party Part II: Party Time- where I’ll share all the details of her very special day.

J’s Ariel Pool Party Part I: Invitation and Party Prep

Just as it got down to crunch time for J’s Big Birthday Adventure, she became obsessed with Disney princesses.  Suddenly, she wanted to change her theme from Dora to Ariel of the Little Mermaid.  As I had painstakingly hand-painted twenty Dora Backpacks and Diego Rescue Packs, I was not about to abandon the theme.  No way kiddo! I appeased J by promising her she could have an Ariel pool party.  At the time, I had no intention of doing anything more than inviting her cousins over and calling it a pool party.  After all, what three year old throws a pool party? #3goingon13

Then, I made the mistake of creating a Pinterest page for an Ariel-themed party, and I was hooked!  Check it out here. I saw several good ideas for a seashell invitation. Mind you, I had no need for a printed invitation. The guest list was limited to a handful of friends and classmates. An Evite  or email would surely suffice.  But the idea was too cute to pass up, so before I knew it, I was drawing a seashell template, which I photographed with my iPhone and downloaded to my laptop using an app called CamScanner.  I then added my own text and an Ariel image.  Please see my blank template below and feel free to use it for your own party:

Arielseashellinvite

I printed the template on lilac and light blue card stock and embellished the front of the invite with puffy paint and ribbon.

DSC_0572 DSC_0570

Yup, I was pretty proud of the way it turned out. I was on a roll and could not be stopped, so I nearly swooned when I saw this idea for paper lantern jellyfish on PartyCity.com. See instructions here.

JELLYFISH_LANTERNS_FRAME

Off to the Dollar Store I went.  I came home with all kinds of goodies including lanterns, streamers, curling ribbon and plastic tablecloths. I could not bear to cut the lantern as suggested in the instructions as  I would surely find a use for it after the party had ended.  This meant my jellyfish did not quite have the right shape, but I think they are still distinguishable as jellyfish.

J and I worked hard on a dessert table display using a blue plastic tablecloth for the ocean, a fish net and green hula skirts for seaweed. We then decorated the seaweed with fish stickers and white barnacles (mini cupcake liners). J was such a tremendous help with this art project.  She may turn out to be crafty just like her Mom and Dad.

DSC_0598

Also pictured is a fun Sebastian felt craft found on the Disney Family website.

sebastian-craft-photo-420x420-mbecker-001

Finally, I wanted to make a quick and easy wreath for the front door.  I found aqua burlap at WalMart and used it to wrap a green foam wreath form to which I glued seashells, starfish and an Ariel ribbon.

DSC_0701

Now we just had  to prepare an ocean themed menu, and we were ready for the guests to arrive.  See Part II here.

J’s Big Birthday Adventure Part IV: Food and Decor

I promise you this is my last installment. I am completely Dora’d out, and J has moved onto princesses anyway. She has informed me that she is having a Princess Ariel pool party this summer, a Princess Sofia birthday when she is 4, a Princess Rapunzel party when she is 5 and a Princess Aurora party when she is 7. Really need to work on her counting.

Decorations for J’s party were really easy. Earlier in the week, I had used this online kit from Shery K Designs to make cupcake toppers for J’s at school party (Yes, this child celebrated her birthday with not one, not two, but three separate parties. Soooo spoiled).

IMG_6490

Also in the kit are pendant flags, which I printed on card stock and hung on the fireplace and in the dining room.

The giant Dora and Diego balloons were a huge hit with J who dragged them around the house for weeks.  They were purchased at Party City.

Our friend Rachel works for a company that specializes in personalized invitations and stationary. She surprised us with three huge personalized Happy Birthday banners- two I hung in the entry way and amongst all the Explorer Stars in J’s hallway. The third I used to dress up the coloring table. You can buy yours here. The Dora and Diego coloring pages were downloaded at Nick Jr.

The cake, Explorer Stars activity and prize box and party favors were displayed on the entry way table. It was not long before someone put their finger in the cake! The cake came from HEB. It looked nice enough and was less expensive but not as tasty as a custom cake. I really need to either cultivate a dormant talent within me for cake decorating or make good friends with someone who rocks in this area.  There was also a copy of Dora’s Birthday Surprise that I intended to use as a guest book, but, alas, I forgot to make this announcement.

For food, we had Mexican. Some of the menu items included: Tico’s Taco Bar (a full taco bar with all the fixings), Isa’s Empanadas, Fiesta Flautas and Diego’s Animal Rescue Center (cheddar and pretzel flavored goldfish, Teddy Grahams and animal crackers).  I had full intentions to label the food with the corresponding character, but I ran out of steam at the end. I still think it would have been very cute.

Despite the cold and THE cold, the day was a great success.  I don’t know if I can be easily convinced to throw another large party next year. I may again require a two year recovery period. But if anyone can melt my resolve, it would be my sweet little Juliette. Love her to pieces.

IMG_6589

J’s Big Birthday Adventure: Part III- Party Time

Finally, the week of J’s big birthday party had arrived.  And we almost did not make it! Several things conspired to get in our way.  First, the lower field of our septic’s leach field went out. Please click here to view my previous septic woes. We still had one functioning field, but septic issues are certainly not welcome when you are about to have 30-40 people over who, inevitably, would like to flush the toilet without issue.

The second was that Juliette came down with a cold and managed to have a fever which kept her out of school on both the Thursday and Friday prior to her party.  We went back and forth to the doctor’s to get tested for ear infection, strep and flu. All negative. J, herself, remained in high spirits throughout. However, I felt the need to proactively send an email out to her class to let the parents know that although she was fever-free and the party would go on, we would certainly understand if anyone wanted to drop out to avoid potential germs.  No one really did.  Getting sick is a constant thing in daycare. I think most everyone else has made peace with that.

Third, and most importantly, despite a beautiful fall here in the ATX, the weather on that day never really rose above freezing.  This put a huge damper on the planned activities, namely the Dora map adventure ending with a piñata and play time on J’s house with a slide. We were also going to borrow a bouncy house, but it was just too cold.

Not easily deterred, I abbreviated the map adventure and added an indoor component that required searching for Dora’s explorer stars. Dora’s explorer stars are cute pastel stars with faces on them that have the points of the stars rounded off. Needless to say, I did not have the time to cut out a bunch of stars on the night before the party. Instead, I found some foam stars at WalMart. They were red, white and blue- leftover from the 4th- so not ideal, but they had to do.

To start the activity, my helpers rounded up the kids, got them to quiet down for a moment or two, and each was handed their Backpack or Rescue Pack.  I explained to them that their first mission as Explorers was to find the explorer stars hidden in plain sight throughout the house. Inside their backpack was a magnifying glass to help them find the stars. Each Explorer who brought back at least one star could pick a prize from the prize box.

Next, we bundled up the kids and headed outside for the map adventure. I informed the kids that Swiper had stolen the birthday piñata, and we had to follow the clues on the Map in order to get it back. We had go through the Dancing Trees, around Crocodile Lake and onto to Play Park, and there we would find the birthday piñata.

mapside1

For the Dancing Trees, I had good intentions to actually go out and pin faces to my trees. Alas, I ran out of time, but I did have the kids take out the maracas in their backpacks and dance to the Coconut Conga. In the Dora TV series, that is how they get the Dancing Trees to open up a path to allow them to pass. I used the video below as my inspiration.

For Crocodile Lake, I placed a blue sheet in our fire pit and placed a blow up crocodile on top.  Actually, it was a blow up alligator ring toss game, but I figured three year olds would not be so discerning.  We did not play the ring toss game due to the cold, but we did need to find a way to get around the crocodiles safely. Fortunately, each kid had a flute in their trusty backpack. They played their little hearts out, which lulled the “crocodile” to sleep and allowed us to walk around without incident.

51-XMAHq5QL._SY300_

Finally, we arrived at Play Park.  We were supposed to take our Dora and Diego blow outs out of our backpacks and sing the “We Did It” song, but it was really cold, so we went straight to the breaking of the piñata.  Each kid got at least one turn before the adults helped to liberate the candy.

The kids really wanted to play on J’s playscape at this point, and the parents really, really wanted to get back to the warm house, so cake time it was. I think the kids had a great time despite the weather. My only regret is not taking more pictures. But chaos does tend to ensue with that many three year olds!

I had not planned on a part IV, but I cannot NOT discuss the decorations. So I will gear up for one more blog entry before I conclude this chapter. Until then Explorers.

J’s Big Birthday Adventure: Part II- Party Favors

DIYBackpackRescuePackFavorBags

I’ll be honest. After engineering over 20 Backpack/Rescue Pack invitations, I was pretty beat. But I knew my work was far from done.  The fear in inviting your child’s entire class to a party is that either a) no one will show up or worse b) everyone will show up. I had my work cut out for me if I was to entertain a bunch of three year olds. I thought a Dora map adventure might do the trick. I planned to follow the general format of the show and sent the kids out into my big back yard to search for the birthday piñata.  Why do they have to find the birthday piñata.  Well, Swiper stole him silly.  You really need to keep an eye on that Swiper.

There can be no map adventure without Map and Backpack. I knew I needed to fabricate both of these.  Also, there would undoubtedly be things we would need to do at each of the stops on the map. This solved the dilemma of what to make for party favors. Clearly, each of the girls needed Dora’s Backpack, and each of the boys needed Diego’s Rescue Pack. Inside would be all the items needed along the way. Once we reached our final destination and broke open the piñata, the bags would be very handy for storing all the candy.

As you know, there are many crafty mommas out there. I pinned several Backpack/Rescue Pack party favor bags on my idea board here. Some of my favorites were:

Using orange and purple lunch bags or gift bags such as these Rescue Packs by Reading Confetti

diego birthday party 33

Dying Oriental Trading backpacks purple as with these Backpacks by Googly Eyes and Glitter 

diy dora party backpacks

Using drawstring backpacks such as these seen on Etsy 

il_570xN.443952275_lqxo

Or reusable grocery totes such as these on Mission Decorate 

grocerytotedorabackpack

I really liked the idea of the kids having a wearable, reusable bag so I narrowed down my options to drawstring backpacks or reusable grocery bags.  I found both purple and orange totes and purple and orange drawstring  backpacks at affordable pricing online. Ultimately, I went with the drawstring backpacks as they were larger and could actually be worn as a backpack.

For Backpack, I used the template found at Nick Jr. to trace the face onto the drawstring bags using Elmer’s Painter’s Pens. I traced the template first in pencil and then went over it using a fine tip sharpie. I used paint pens rather than fabric paint to fill in the color so that the work could go quicker with less chance for mistakes. The downside is that the paint pens are opaque. This was not much of an issue for the red mouth but required multiple coats for eyes and eyebrows and just did not provide the coverage that fabric paint would have. Still, I think they came out pretty good.

For Rescue Pack, I also used the template from Nick Jr but needed to resize and tweak it a bit.

Map needs to go inside Backpack.  I used the Nick Jr map template above photocopied on one side of 8 1/2 x 11 white paper and photocopied a map of my own drawing on the other side. I searched and searched for an easy map template. The best I could find was this. I used it as a general template and then did separate image searches for the stops I chose for J’s adventure: The Dancing Trees, Crocodile Lake and Play Park. The last stop is actually J’s playscape, so I just drew that from memory. It came out pretty good for someone who doesn’t draw, and might help someone else out in the future. For PDF versions, please visit my free printables page.

mapside1

mapside2

Inside the backpack were the items we needed for the adventure: a Dora or Diego magnifying glass, Dora and Diego maracas, a mini flute and Dora or Diego blow outs. More on the specific purpose of these items in the next post.

The finished product can be seen below.

IMG_6500

Again, I will not lie to you.  This is not a quick, easy project. Because I did not trust myself to free hand the face and was very careful with the paint pens, each bag took some time. I made 20 and was very thankful for one particularly long nap both J and D took one Sunday afternoon. J often sat at the table next to me coloring while I would knock out 1 or 2 bags. If I were to do it again, I would STRONGLY consider printing each of the faces in color on iron-on transfer paper.  There are several face template files available to purchase on Etsy and would have been well worth the money. I think this may have been 10x easier. Hindsight is 20/20.

Stay tuned for Party III- Party Time to find out how our adventure went.

J’s Big Birthday Adventure: Part I- The Invite

Some of you may recall that I made my blogging debut by writing about my daughter’s first birthday party.  In fact, the helpfulness of other moms in the party planning arena was what pushed me to start my own blog. If you would like to refresh your memory, feel free to to take a glance at Once Upon A Birthday Party Part I, II or III.

Well, it turns out that kid parties- when you go all out in a crazy crafty kind of way- are exhausting. I needed a full two years to recover from J’s first. I vowed to hold off on another one until at least school age. And then J started day care, and we started to get invited to lots of other birthday parties. In fact, J’s entire class seems to have birthdays that fall between October and January. She naturally assumed that I too would throw her a party that included cake, a bouncy house and goodie bags. I could not disappoint, and that is how Juliette’s Big Birthday Adventure came into being. The theme- D-D-D-Dora… Dora, Dora, Dora the Explorer.

dora.jpg.250x250_q85_crop

I must admit that I was a little disappointed that she did not like my ideas for a Blues Clues or Peppa the Pig party. Ultimately though, I embraced the theme and found that ideas abound on the web for Dora/Diego parties. See my pinterest inspiration board here for a few examples.

The Invitation

Every great party must have a great invitation. When you google “Dora” and “Birthday,” you are sure to come across the DVD  or game Dora’s Big Birthday Adventure.

doraDVD

I loved the DVD logo and the idea of the party being a map adventure. Both had to be incorporated in the invite. I also really loved all the hand made backpack invitations I saw online.  Here is one of my favorite examples from HighHeelsAndDiapers.com

invite-7

Super cute and there are several templates available online including this one and another FromBeccasHome.blogspot.com. Problem was I wanted both an adorable card stock backpack and a clever photo invite. This is how I came to spend several sleepless nights unsuccessfully attempting to build an invite on google docs (MS Word, Powerpoint and Google Art), downloading several free photo editors and even a free trial of Adobe Photoshop before finally begging my sister to help me. She is a pro at PhotoShop and came up with this invite (minus the personal details which have been removed). If you do not have a talented sister, may I suggest this invite template by Shery K Designs.

Juliette-opt5-FIXED

I could not possibly be satisfied with this awesome invite by itself. Nooooo. I had to still house it in Backpack or Rescue Pack. Must not have gotten my fill of cutting and pasting as a child. Of course, since I wanted to fit a 4×6 vertical photo card in the backpack, I needed to draw my own template. I promise to scan it and post it here when I get a chance. Of note, I made a 2 piece template as I wanted to use 8.5 x 11 card stock that I already owned. I could have done it in one piece if I had purchased 12 x 12 card stock.

After another sleepless night of tracing, cutting and folding, I ended up with a pile like this:

IMG_6375

One more sleepless night for assembling and gluing and Backpack and Rescue Pack finally came to life.

IMG_6380

Did I mention that I made 21 of these? Do not let those Pinterest Mommas- present company included- fool you.  This was no easy feat. I delivered these invites to J’s classroom on a Monday. By the time Friday rolled around and some of the invites were still in cubbies instead of getting their due fridge time, I was very much inclined to give the evil eye.  Ok,  I might have. There, I’ve admitted it. But it was a labour of love- both for my J and all things crafty. Wait until you see what I came up with next in Part II- Party Favors.

Halloween Only Comes Once A Year

Ok, so I know I am a little late with this post also, but I really wanted to share with you my recent Halloween projects.  This was the first year that J was truly into Halloween. Last year, she was super cute telling everyone that she was going to be a “Baby Bug” aka Lady Bug. However, this year, she went as far to pick out her own costume- Princess Ariel- and was not shy about going door to door to beg for candy.  She is very aware of all the candy she received and asks about it from the time she wakes up in the morning to the time she goes to bed. Daddy could not get away with eating her candy this year. She would notice if a single piece went missing.

J also now goes to daycare, or “school,” several times a week and had a class party. I had been admiring some of the cute snacks folks were pinning on Pinterest, and thought I would like to give it a shot. See my inspiration board here. I did a little googling myself and decided on the following.

Witch’s Hats

These are made with a Keebler Fudge Stripes cookie turned fudge side up. Simply use a little cake frosting (the kind in a tube is fine) to glue an unwrapped Hershey’s kiss in the hole. Add more frosting around the perimeter of the circle to make it look more like a witch’s hat. Sprinkles are optional, and getting them to stick was the hardest part of this treat.

IMG_6340 IMG_6341

Witch’s Brooms

Moving along to something a little healthier, I made witch’s brooms out of pretzels and string cheese. I used small stick pretzels and cut each cheese stick into thirds. I used my kitchen shears to make the cheese look like the bottom of a broom and inserted the pretzel in the top. As a finishing touch, many folks tie the broom with either chives or licorice. I initially tied mine with string licorice but didn’t like the cherry licorice-cheese taste combo and did not think my licorice tying skills were at all good.

An important note on this one. If preparing the night before, make all the cheese brooms ahead of time and then insert the pretzels in the morning. The pretzels will become soggy in the fridge. Of course, I brought them to school at 7 in the morning, so I am sure the school refrigerated them, but refrigeration for a few hours is probably better than a whole night and then some. No one likes a soggy pretzel.

IMG_6357 IMG_6361

Jack O Lantern Oranges

And while watching the Red Sox win the World Series (Go Boston!), I began to fear that, perhaps, there were not going to be enough healthy snacks at this party. So I got out a sharpie and started drawing faces on cuties to turn them into Jack O Lanterns. I quickly found out that the citrus in the peel kills your sharpie and moved on to a kid friendly dry erase marker. Don’t worry, folks, the marker does not penetrate the peel.  I did take the time to confirm this and also that the marker did not rub off onto little fingers when held. I feel pretty confident that oranges remained 100% safe to eat.

IMG_6348

My Facebook feed was filled with a lot of cute pictures of snacks made by other mommas I know. I can’t wait to try out some more ideas next year. I love when I’m able to pull off a Pinterest project without a hitch as I could probably come up with several blog posts under the heading “Pinterest Gone Wrong.”

Happy Belated Halloween!

IMG_6367