
I’ll be honest. After engineering over 20 Backpack/Rescue Pack invitations, I was pretty beat. But I knew my work was far from done. The fear in inviting your child’s entire class to a party is that either a) no one will show up or worse b) everyone will show up. I had my work cut out for me if I was to entertain a bunch of three year olds. I thought a Dora map adventure might do the trick. I planned to follow the general format of the show and sent the kids out into my big back yard to search for the birthday piñata. Why do they have to find the birthday piñata. Well, Swiper stole him silly. You really need to keep an eye on that Swiper.
There can be no map adventure without Map and Backpack. I knew I needed to fabricate both of these. Also, there would undoubtedly be things we would need to do at each of the stops on the map. This solved the dilemma of what to make for party favors. Clearly, each of the girls needed Dora’s Backpack, and each of the boys needed Diego’s Rescue Pack. Inside would be all the items needed along the way. Once we reached our final destination and broke open the piñata, the bags would be very handy for storing all the candy.
As you know, there are many crafty mommas out there. I pinned several Backpack/Rescue Pack party favor bags on my idea board here. Some of my favorites were:
Using orange and purple lunch bags or gift bags such as these Rescue Packs by Reading Confetti

Dying Oriental Trading backpacks purple as with these Backpacks by Googly Eyes and Glitter

Using drawstring backpacks such as these seen on Etsy
Or reusable grocery totes such as these on Mission Decorate

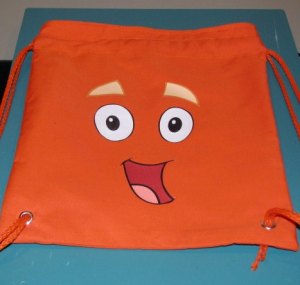
I really liked the idea of the kids having a wearable, reusable bag so I narrowed down my options to drawstring backpacks or reusable grocery bags. I found both purple and orange totes and purple and orange drawstring backpacks at affordable pricing online. Ultimately, I went with the drawstring backpacks as they were larger and could actually be worn as a backpack.
For Backpack, I used the template found at Nick Jr. to trace the face onto the drawstring bags using Elmer’s Painter’s Pens. I traced the template first in pencil and then went over it using a fine tip sharpie. I used paint pens rather than fabric paint to fill in the color so that the work could go quicker with less chance for mistakes. The downside is that the paint pens are opaque. This was not much of an issue for the red mouth but required multiple coats for eyes and eyebrows and just did not provide the coverage that fabric paint would have. Still, I think they came out pretty good.


For Rescue Pack, I also used the template from Nick Jr but needed to resize and tweak it a bit.


Map needs to go inside Backpack. I used the Nick Jr map template above photocopied on one side of 8 1/2 x 11 white paper and photocopied a map of my own drawing on the other side. I searched and searched for an easy map template. The best I could find was this. I used it as a general template and then did separate image searches for the stops I chose for J’s adventure: The Dancing Trees, Crocodile Lake and Play Park. The last stop is actually J’s playscape, so I just drew that from memory. It came out pretty good for someone who doesn’t draw, and might help someone else out in the future. For PDF versions, please visit my free printables page.


Inside the backpack were the items we needed for the adventure: a Dora or Diego magnifying glass, Dora and Diego maracas, a mini flute and Dora or Diego blow outs. More on the specific purpose of these items in the next post.
The finished product can be seen below.

Again, I will not lie to you. This is not a quick, easy project. Because I did not trust myself to free hand the face and was very careful with the paint pens, each bag took some time. I made 20 and was very thankful for one particularly long nap both J and D took one Sunday afternoon. J often sat at the table next to me coloring while I would knock out 1 or 2 bags. If I were to do it again, I would STRONGLY consider printing each of the faces in color on iron-on transfer paper. There are several face template files available to purchase on Etsy and would have been well worth the money. I think this may have been 10x easier. Hindsight is 20/20.
Stay tuned for Party III- Party Time to find out how our adventure went.

Pingback: J’s Big Birthday Adventure: Part I- The Invite | While Everyone Else Is Sleeping
Great job and happy you found my Dora Party post helpful! I hope the party was a great success.
These are super cute! I can not believe though you said you don’t draw.. you did a great job! The kids would enjoy the party, and that’s for sure! 😉
I might copy this idea for my son’s 5th birthday in 4 months, he likes Dora and Diego too! Cheers! 🙂
I wanted to find the face template to use the iron on technique and I can’t find it. Can you point me in the right direction?
Hey Kim, try etsy. They had several downloadable image files for sale. I pinned at least one on my Pinterest page. There is a link to it on the right hand side of my blog. Then you can just buy iron on transfer paper and print it on that. There are different kinds for printing an image that is reversed vs. already the way you like it.
Where did you buy your drawstring bags? I’m making favor bags for niece’s birthday party & I only need a total of 15 bags. Were you able to buy what you needed or did they come in bulk by color?
There is a link to the bags I used in the post above. The bags were from Oriental Trading but I purchased them from a reseller on Amazon for less than $1 per bag. They are sold in lots of 12 by color. Best of luck!